Notes to Remember
5. The next field, length of note in ticks, is the number of rows the note will play before cutting.
| Setting up Buzz | |
| First you must setup the proper waveout device. | |
|
|
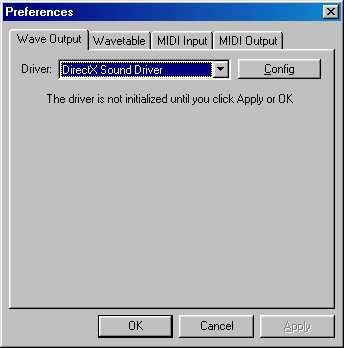
1. Go to View > Preferences |
| 2. Select the desired device from the list. | |
| For windows 9x, choose DirectX Sound Driver out. | |
| For Windows NT, choose Windows Waveform Audio. | |
| 3. You may need to configure it by pressing the Config button. | |
| You can test your setup by loading the demo tune (under \buzz\songs) and pressing the Play Button (F5) | |
| General Buzz concept | |
| The main idea behind Buzz is you have machines which interconnect as modules, and produce sound. | |
| Machines can either generate or modify sound. | |
| - Generators, simply enough, generate sound (like 303 style bass, or tracker, which is like a sample based tracker.) | |
| - Effects modify the generated sound (like reverb, delay, flange, etc.) | |
| To create a new machine click on the View Machines button (F3), right click on the background, and select the machine you wish to create from the popup list. | |
| For the purpose of learning Buzz, select the Jeskola Bass 3 from the list. (Generators>Synthesis>Bassline>Jeskola Bass 3) | |
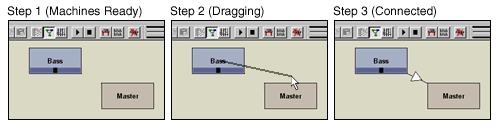
| Connecting machines | |
| Now that you have a new machine, you must connect it to the existing master machine - forming an audio chain to the output. | |
| To connect machines, hold down shift and drag a line from the source machine to the destination machine. | |
|
|
|
|
Notes to Remember |
|
| 1. All machines must be connected to the master machine either directly or indirectly (by linking through effects) to produce a sound. | |
| 2. You cannot have anything trying to go into a generator. | |
| 3. An Effect cannot start a chain. It needs input to modulate. | |
| 4. You can have many generators going into the same effects machine and likewise many machines going into the master. | |
| 5. Any machine connected to the master can have it's panning changed by sliding the little block on the machine itself. | |
| Programming the machines | |
| Now that you have your machines laid out, you have to program (Add notes, Adjust Parameters, and Sequence) them. | |
| 1. Go to the Pattern Editor (F2) and select which machine you wish to create. | |
| 2. Then CTRL-ENTER (or Right-click > New Pattern) creates new patterns | |
| For those with Tracking experience, the pattern editor works just like a tracker. If you are unfamiliar with tracking you should check out MAZ Sound. It is a tremendous resource for Tracking and Free audio tools. | |
| Notice that information about the highlighted field shows up on the status bar at the bottom of the screen, including the description of the current effect in the tracker generator. | |
| Most of the parameters in the machines, such as filter cutoff and resonance in the Bass-2 module, can be modified in real-time in the Parameters Dialog. | |
| This can be found by pressing the View Machines button (F3), right clicking on the desired machine, and click on Parameters. | |
| CTRL + creates new tracks in the patterns (just like channels in trackers.) | |
| Programming the Bass-2 machine | |
| The bass-2 machine is fairly easy. | |
| 1. You can set the filter cutoff and resonance in the first two columns by entering a number between 00 and 80 (remember, they are in hexadecimal.) | |
| 2. Cutoff envelope mod and decay are the next two columns and are the same. | |
| 3. Waveform is the shape of the soundwave. | |
| Sine and sawtooth are straightforward. Pulse is a square wave. Triangle is slightly different from sine and noise is, well, noise. | |
| The next column is the note (C-0 thru B-9.) Use the keyboard letter keys to enter notes. | |
| 4. Volume is next, again in hexadecimal (actually, all fields are hex except for note fields.) Vol. is 0-80, and 81-FE is 100%-~198% volume amping. | |
|
5. The next field, length of note in ticks, is the number of rows the note will play before cutting. |
|
| 6. The last field is the note slide-to field. If you had C-4 in the note field, 02 in the length field, and C-5 in the slide field, C-4 would play and slide up to C-5 in two ticks. | |
| Programming the Tracker machine | |
| The Tracker machine is very much like the Bass-2 machine except that instead of generating a wave, it relies on samples, much like regular trackers. | |
| 1. The first field is tick subdivide. This number is the number of times the effect is processed per row. | |
| 2. The next field is the note, explained above in the Bass-2 section. | |
| 3. The next number is the wave which will play at the selected note. This number corresponds to the slot with the same number in the Wavetable (F9) section. | |
| You can load samples into these slots by selecting a WAV (only mono-16 bit) or XI from the list on the right (be sure to setup the wav dirs in the preferences menu) and clicking on the << button. | |
| 4. The next column is volume, again explained above in the Bass-2 section. | |
| 5. The last two are effect number and effect data. These work just like in a tracker.You can find out which effect number is what effect by entering it and looking below at the status bar. | |
| All in all, this generator works pretty much like every tracker. | |
| Using the Sequence Editor | |
| The Sequence Editor (F4) is where you build the tune.You order which pattern should play when for each machine. | |
| The list on the right shows available options for each field in the orderlist. | |
| To create a new track press CTRL-ENTER. | |
| F6 sets play position to current row | |
| CTRL-B sets the beginning of the loop (really beginning of song) | |
| CTRL-E once sets the end of the loop, twice sets the end of the song. | |
| CTRL-I inserts a row to all track | |
| CTRL-D deletes a row from all tracks | |
| Pressing '.' on an order will set it to (shown as ...) This means nothing new will play, but any currently playing pattern will not be cut. | |
| Pressing ',' will set it to . This will cut any currently playing pattern. | |
| Once you have ordered your tune, press the Play Button (F5) | |
| To play your tune from the cursor, press F6 | |
| To stop the song, press F8 | |
get it on www.buzzmachines.com